Monday 8 April 2013

Fragrance Direct Haul

IT'S SO COLOURFUL!

Anyway, I thought I would share with you what I purchased from Fragrance Direct-
 I spent only £21, so you'll understand how happy I was to get all of this (and more!). Some of the products are missing due to my mum- sorry!


(From left to right) 080 Cherry Pop Maybelline Colour Sensation Pop Stick (£1.99), Calvin Klein Desire Crème Lipstick (£1.99), Rimmel London Lasting Finish Lipstick in 122 Stylish (£1.99), Essie Mojoto Madness (£1.99), Essie Off The Shoulder (£1.99), Essie Action (£1.99), Rimmel London Moisture Renew Lipstick in 400 Berry Queen (£1.99), Rimmel London 60 Seconds in 805 Grey Matter (£0.99), Rimmel London 1000 Kisses Lip Tint in 300 Perpetual Plum (I did not purchase this on fragrancedirect but I do know it is available on there).

I will gradually post reviews so if anyone has any questions ill be happy to answer!

(P&P: First Class £1.99, Second Class £2.99) 

Love you all!


IG|floralteacups

Sunday 7 April 2013

Skin Care and Treatment


(As seen on IG|stylelikevogue where I also post these)


The key to healthy, clear skin is a good skin routine.

1- Remove all makeup using either liquid makeup remover or makeup wipes. I use Simple Kind To Eyes Eye Make Up Remover for removing eye makeup and Lacura 3 in 1 Cleansing Wipes for my face and neck. (The Simple range can be purchased in any major drugstore. The Lacura range can be purchased at Aldi. Although you wouldn't think of Aldi being known for skin cafe products, their Lacura range is excellent and well worth a try!). 

2- Cleansing and Toning. This is a vital part in the skin care routine as although many people do not cleanse and tone their skin, it's important that you do. Cleansers and Toners can be purchased in any brand but, like most skin products, I prefer to use the Good Things range. Good Things Deep Pore Anti-Blemish Cleanser is an excellent cleanser that if used daily will remove any hidden dirt from your pores. Using cotton wool, apply the cleanser to your face and neck, you'll be surprised at the result and it will make you realise just how dirty skin gets. 

3- This is optional. I find that using a face pack once or twice a week cleans your pores and brings out all the bad bacteria that you don't want. I use MONO Warming Aromatic Mask but face packs can be purchased practically anywhere now for all sorts of prices. 

4- MOISTURISE! This is the most important factor in the routine. You have to moisturise. Using moisturiser at least twice a day will keep your skin healthy and hydrated and will prevent your skin from flaking, going powdery and if you wear foundation it will give a smoother effect. For those of you who do wear skin makeup, you have to moisturise regularly as foundations and powders are prone to drying out skin so it is important that you keep your skin hydrated. I use Good Things Miracle Mattifier Moisturiser but moisturisers can be purchased from a wide variety of brands in any drugstores/supermarkets. 

5- This step is only for those who suffer from dark circles or 'bags' under their eyes. If you suffer from dark circles, much like myself, then this is a product that is worth investing in. Good Things Bright Eyes Eye Cream reduces dark circles and puffiness.

6- Spot treatment. For years I had been hunting down a good spot treatment but last year I finally found one! Good Things Stop That Spot is a clearing gel which works wonders at reducing redness and visibility of acne and occasional spots. Using tubes or bottled spot gels and creams are much better than using wands or sticks. Wands and sticks = more spots. Using a wand spreads the bacteria around your skin, causing the issue to escalate which is the opposite of what should happen. I highly recommend not to use wands or sticks if you suffer from skin problems as they will NOT work! 

I hope this helped some how, please leave your feed back- I'd love to hear your opinions! The products listed can be seen at the end of this post.

Love you all!


All of the products mentioned are available to purchase at any major drugstore and/or supermarkets.


Saturday 6 April 2013

Review Of The Week- Rimmel Lipsticks

Review Of The Week: 

(As seen on IG|stylelikevogue)

Over the past few weeks I have been attempting to build up my Rimmel lipstick collection, and so far I have successfully purchased three (with more waiting for me at the post office!). I find Rimmel's products so reliable and so worth the money, which isn't as near as expensive as it's rival drugstore brands. 

The latest formulas for their lipsticks; the Kate Moss Collection and the Matte Collection are big sellers to women and girls everywhere with their excellent coverage, creamy texture and long lasting colour. These are three of my favourite colours: Shades 03, 080 One Of A Kind and 107 which is highly popular due to the high praise fashion blogger Zoella has given it throughout her videos. 
I can guarantee you'll love the vast variety of colours in these new ranges and they can be purchased from any online or high street drugstore (£5.49). I hope this has given you a slight insight to the products and that you find a colour to suit you!

Please leave suggestions of which products you would like me to review in the future.

Please follow our group fashion instagram @stylelikevogue for more fashion, beauty and everyday tips, reviews and styling ideas!

Love you all!


PS- I am so so so so soooo sorry for the large expanse of time I have abandoned my blog and you beautiful people for! I shall be blogging (hopefully) much more now I am posting slightly less on instagram.

IG|floralteacups


Wednesday 6 February 2013

Instagram Give-Away

Hi!

Before I start I just want to say, this is the first post I've made on my phone so that's why it is different in layout etc to my usual posts.

So, a few days ago I decided to do a give-away. This is we're you buy prizes or presents for your followers and, like the title says, give them away for free!

I decided that when I reached 2k on instagram I would do one. So I have! Go check out my instagram (floralteacups) and repost the photo with the hashtag #floralgiveaway for the chance to win!

Good luck my lovelies!

If you have any questions then comment on this post or feel free to contact me on Instagram.

Love you!

Hannah xx

Sunday 27 January 2013

How To Make A Bow

Hi!

I was asked by annaroseparker on Instagram if I could do a tutorial of how to make a bow, so here it is!

I apoligise for the poor quality of everything, I had to take pictures of them with my left hand and it went all shaky and weird, plus I apoligise for the state of my nails and hand, they need some well deserved tlc!

Firstly you will need;

 Scissors (I use normal scissors but fabric scissors are the best option)
 Fabric, practice on old pillow cases until you get the jist of it
 Needle and thread
 Sewing Machine (preferably)

Ok, so here are the steps of How To Make A Bow:

 Get your fabric (I use old bedding etc) and your scissors and place them on your workstation/desk/bench or whatever you plan on making it on


 Cut out a rectangle making sure that along the bottom is the size you want your bow to be and the sides are double the width you want your bow to be as you are going to be doubling it over
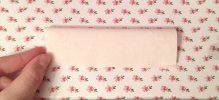


 Fold your rectangle in half, doubling it over as explained in the previous instruction, making sure the patterned side or nicer side is on the inside/unseen


 Trim your rectangle as I tend to make them too long (as I have in this case). Doing this makes them a more bow shape rather than an odd, long, squashed shape


 Sew along the sides, leaving one side open (preferably the top) as shown below


 I then trim the sides so it is neater, make sure you dont do it too near the stitches or else you'll cut through them


 Turn your fabric inside out so that the patterned/nicer side is now visible, be careful when doing this as you dont want to split the fabric or stitches


Fold in the open side, creating a neater edge 


 Sew carefully along this edge, this will now close the rectangle creating the body of the bow


 Cut a strip of fabric to use as the middle section of the bow, making sure its long enough to fit around the bow (can be cut shorter later on)


 Pinch the bow in the center and wrap the strip of fabric around the middle, keeping hold of the two ends of the strip


 Stitch the two ends together, make sure you sew them together securely otherwise they'll come loose. Don't sew the strip to the actual bow


 Turn it over and sort out the bow, positioning it correctly etc.


 Now you have a bow!


I hope that made sense and that you all learnt how to make a bow! I tried to make it as simple as possible but if you need to contact me for any further information then I shall leave my details at the end.  

Love you!

IG|floralteacups
KIK|hhhannah_